Why New Bathrooms Still Develop Mold and Odors

Learn why new bathrooms develop mold and odors despite fresh finishes. Explore ventilation, waterproofing, and leak checks to find the cause and keep your bathroom dry.
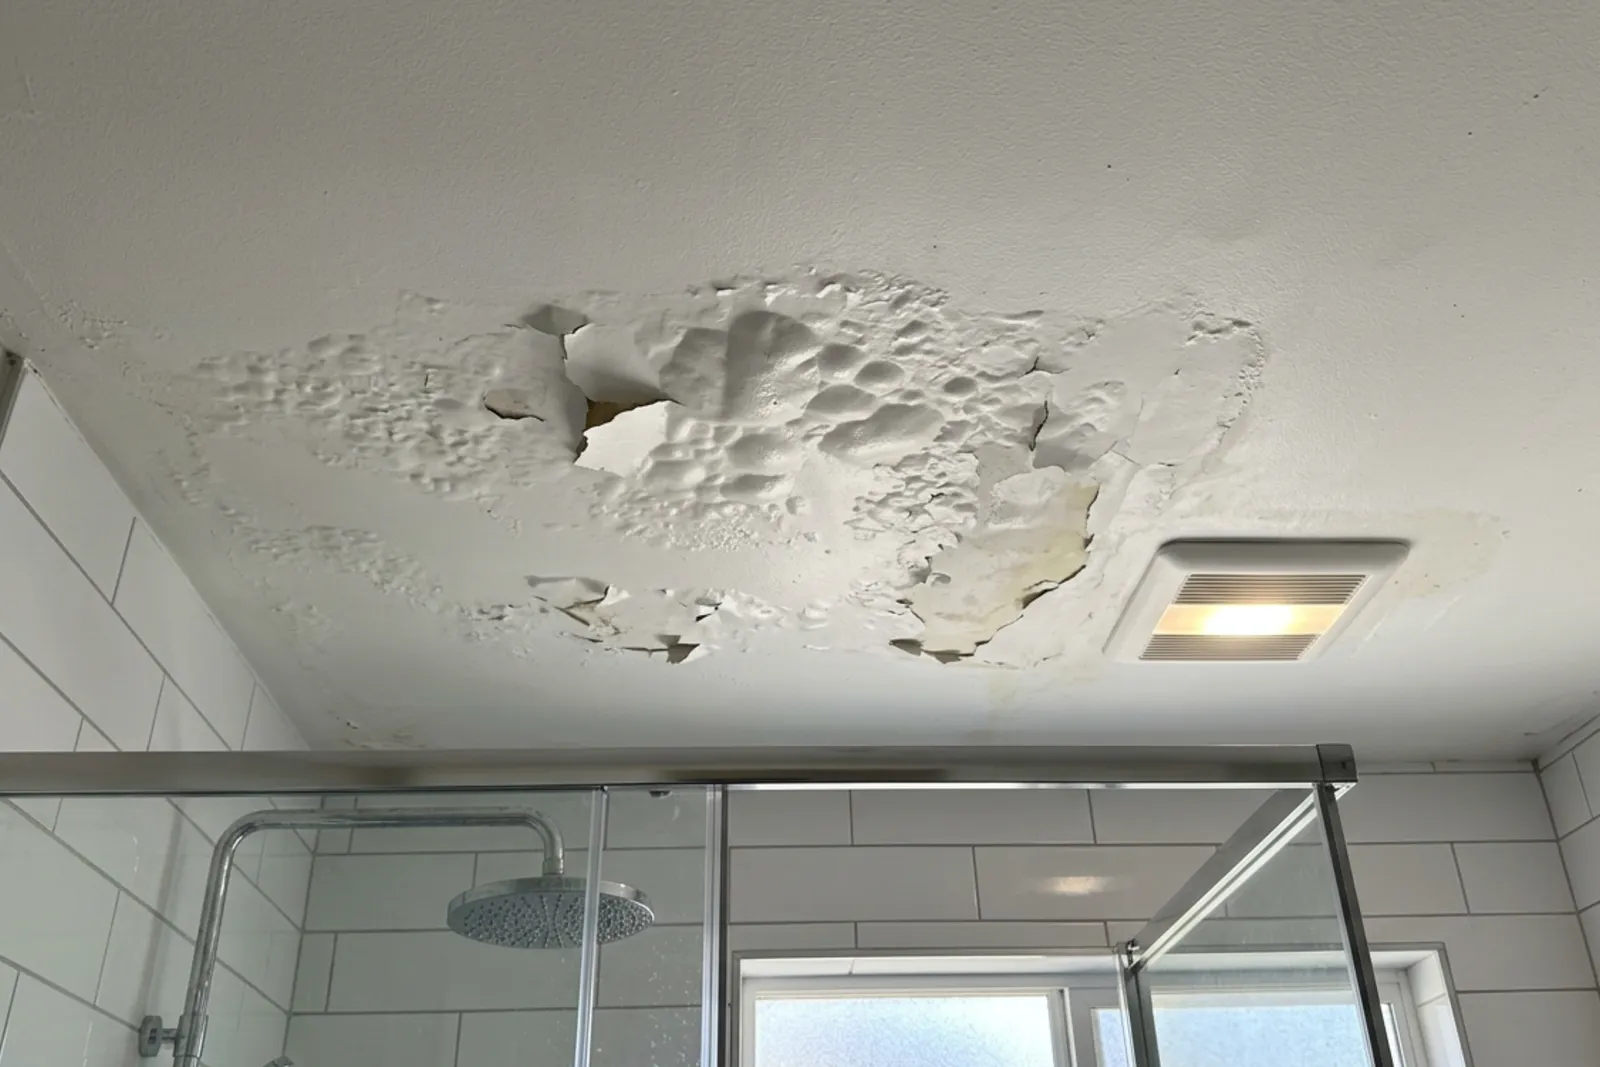
A bathroom can look immaculate on renovation day and smell musty a few months later. Paint starts bubbling above the shower. Dark spots return along the ceiling. The mirror stays fogged long after everyone has finished getting ready.
These problems are frustrating, especially after an expensive bathroom renovation. But new tile, fresh paint, and attractive cabinetry do not guarantee that the room can manage moisture. Much of that work depends on systems you cannot see: exhaust ducts, waterproofing, plumbing connections, and the materials behind the shower walls.
In Metro Vancouver’s wet climate, drying can be particularly difficult during cooler months. The answer is not automatically a bigger fan or another coat of mold-resistant paint. First, you need to determine whether the moisture comes from humid air, liquid water, a plumbing leak, or some combination.
A New Finish Does Not Mean a Dry Assembly
Bathrooms have two separate moisture-control jobs.
The first is removing water vapor produced by showers and baths. Exhaust ventilation handles much of this work, supported by adequate replacement air and reasonable indoor humidity.
The second is keeping liquid water out of walls and floors. That requires a properly constructed shower assembly, sound plumbing, and reliable connections around drains and fixtures.
One system cannot compensate for failure in the other. A powerful fan will not stop water escaping through a defective shower curb. A perfectly waterproofed shower will not prevent ceiling condensation if humid air remains trapped indoors.
This distinction matters because surface repairs often target the symptom. Repainting a damp ceiling may hide staining temporarily, but it does nothing to change the conditions that caused it.
Why Bathroom Exhaust Fans Underperform
A fan that makes noise is not necessarily moving enough air. Even a new fan can disappoint when its capacity, installation, or controls do not suit the room.
The rated airflow may not reach the bathroom
Fan capacity is expressed in cubic feet per minute, or CFM. Small residential units commonly have ratings around 50 to 80 CFM, but the right capacity depends on room size, ceiling height, fixtures, shower use, and duct resistance.
For planning purposes, a bathroom of roughly 75 to 100 square feet may warrant consideration of a fan around 110 CFM. Larger rooms or heavier moisture loads may need around 150 CFM or another designed solution. These are starting points, not universal requirements.
Actual airflow can be substantially lower than the label suggests. Long ducts, tight bends, crushed flexible ducting, restrictive exterior caps, and stuck dampers all reduce performance. A higher-capacity fan connected to a poor duct route may still leave the room damp.
The useful measurement is installed exhaust airflow, typically tested at the bathroom grille with appropriate equipment.
Exhaust must reach the outdoors
A bathroom duct must discharge outside through an appropriate termination, not into an attic, roof cavity, or soffit cavity.
Warm, moisture-laden exhaust released into an attic can condense on cold roof sheathing. Over time, that can wet insulation, support mold growth, and contribute to wood decay.
Duct design matters too. Smooth, rigid duct generally creates less resistance than flexible duct. Where approved flexible duct is used, it should be supported and stretched rather than left compressed or sagging. Ducts passing through cold spaces generally need suitable insulation and condensation-control detailing.
The fan needs replacement air and enough runtime
An exhaust fan cannot remove air effectively if replacement air cannot enter. An appropriate door undercut or another designed air-transfer path helps it work with the door closed.
Runtime is equally important. Switching the fan off immediately after showering leaves moisture evaporating from wet surfaces.
Running it during bathing and for at least 20 to 30 minutes afterward is a useful starting habit. Some bathrooms need longer. A timer makes this easier, while a properly adjusted humidity sensor can help automate operation.
Tile and Grout Are Not the Waterproofing
Tile tolerates water well. That does not make the tiled assembly waterproof.
Water can pass through grout, joints, and defects. Behind the finish, the shower needs a complete water-management system that directs moisture toward the drain without exposing vulnerable framing or subflooring.
Continuity matters more than a product label
Bonded sheet membranes and approved liquid-applied waterproofing membranes can both work when correctly specified and installed.
Sheet systems require properly treated seams, corners, penetrations, and drain connections. Liquid-applied products depend on correct surface preparation, coverage, thickness, curing, and any required reinforcement. A thin coat that looks waterproof may not meet the manufacturer’s requirements.
Polyethylene sheeting also has legitimate uses within certain approved assemblies, but it is not a universal substitute for a properly detailed shower waterproofing system. Mixing incompatible methods can create gaps or trap moisture between layers.
The important question is whether the entire assembly follows a recognized method and the product manufacturer’s instructions.
Failures often begin at transitions
Flat wall areas are usually simpler to waterproof than curbs, niches, benches, corners, and drain connections.
These locations need careful detailing. Horizontal shower surfaces must slope toward the drain. Fasteners must not compromise critical waterproofed areas. Valve and pipe penetrations need compatible seals.
A shower can look excellent while water escapes beneath its curb. By the time nearby flooring feels soft, damage may extend beyond the visible stain.
Where applicable, an approved flood test before tile installation provides an opportunity to identify defects while repairs are still relatively straightforward.
Hidden Leaks and Drain Problems Can Mimic Poor Ventilation
Persistent dampness is not always a fan problem.
A slow leak at a supply connection, shower valve, drain fitting, or toilet seal can wet enclosed materials without producing an obvious puddle. Water may travel along framing before appearing somewhere else.
Check beneath the vanity for swollen cabinet panels, staining, damp contents, or a recurring odor. Around the shower, look for moisture outside the enclosure, deteriorating baseboards, or flooring that changes color after use.
Odor provides clues, but it is not a diagnosis. A musty smell can indicate damp materials or microbial growth. A sewer-like smell may come from a dry drain trap, plumbing vent problem, failed seal, or drain buildup. Adding a stronger fan will not fix those faults.
Avoid sealing every opening indiscriminately. Some fixture and shower details include drainage paths that must remain open. Follow the specific manufacturer’s instructions rather than assuming more caulk is always better.
Design and Materials Can Slow Drying
An enclosed shower can retain humid air even when the rest of the bathroom feels comfortable. Tall glass panels, partitions, and tightly enclosed layouts may limit circulation around wet surfaces.
Ventilation placement should account for that layout. A fan across the room may not remove moisture efficiently from an enclosed shower, although any fan installed near bathing areas must meet applicable location and electrical requirements.
Material choices affect maintenance as well. Porcelain tile generally absorbs little water and is practical for heavily used wet areas. Natural stone, including marble, requires more product-specific care. Sealing may reduce staining and absorption, but it does not replace waterproofing.
Grout, textured tile, and sealant joints can collect soap residue that stays damp. Even mold-resistant products need cleaning and drying.
Large-format tile is not inherently unsuitable for a small bathroom. The concern is whether it can accommodate the required floor slope, drain arrangement, substrate conditions, and slip-resistance needs.
How to Investigate a Recently Renovated Bathroom
Begin with observations rather than demolition. The timing and location of moisture often help narrow the cause.
Record the pattern. Note whether the odor appears after showers, during rainy weather, or continuously. Photograph stains and track whether they spread.
Check humidity. Use a hygrometer away from direct spray. A brief increase after showering is normal, but humidity that stays above about 60% deserves investigation. Persistent condensation is another warning sign.
Assess exhaust performance. Clean the grille, confirm the fan runs, and arrange an airflow test if drying remains slow. A tissue held at the grille shows suction, not whether airflow is adequate.
Verify the duct route. Ask where the duct terminates and whether it is insulated through cold spaces. A qualified person can inspect inaccessible areas safely.
Look for water damage. Examine vanity interiors, adjacent walls, shower curbs, and nearby floors. Softness, swelling, movement, or persistent dampness warrants professional assessment.
Review installation records. Request waterproofing photos, product details, test records, and inspection documentation.
Hollow-sounding tile alone does not prove a leak. Likewise, a clean-looking surface does not rule out concealed moisture. Moisture meters and selective investigation can help, but readings require interpretation.
Do not enter an unsafe attic or open suspect assemblies casually. Disturbing contaminated material can spread dust and mold.
Fix the Cause Before Restoring the Finish
Immediate measures can reduce moisture while an investigation proceeds. Run the fan longer, wipe excess water from shower surfaces, and use a portable dehumidifier if needed. Keep electrical equipment safely away from wet areas.
These measures buy time. They do not repair a leaking pipe or failed membrane.
If ventilation is the problem, repairs may involve correcting the duct route, replacing a restrictive termination, insulating ductwork, improving replacement air, or installing a suitable fan and timer. A quiet fan is helpful because people are more likely to use it, but sound ratings should be considered alongside airflow performance.
If water is entering the structure, the affected assembly may need to be opened. Damaged materials must be evaluated, dried, repaired, or replaced before reconstruction. Tiling over damp backing or covering decay with new finishes leaves the problem in place.
Extensive mold, recurring contamination, concealed damage, or health concerns justify assessment by qualified remediation professionals. People with asthma, respiratory conditions, or weakened immune systems should be particularly cautious about exposure.
What to Specify Before the Next Renovation
The best time to address moisture is before the walls close.
Ask for a ventilation plan that identifies the fan model, design airflow, duct size and route, exterior termination, and controls. For difficult duct runs, an appropriately selected inline or other pressure-capable fan may be worth considering.
For the shower, specify the complete waterproofing assembly rather than a vague promise to “waterproof behind tile.” Documentation should identify compatible materials, drain connections, treatment of penetrations, and required testing.
Photographs of concealed work are valuable. Keep them with product model numbers, installation instructions, permits, inspection records, and warranty documents.
The budget should reflect that hidden work. Fan upgrades and waterproofing improvements generally cost far less during construction than after finishes must be removed. Exact prices vary considerably with access, electrical work, duct routing, shower size, and local labor costs. A quote that separates these tasks is more useful than a single allowance.
Common Questions About Bathroom Moisture
Is minimum code compliance enough?
Code compliance is required, but a minimum provision does not guarantee satisfactory performance in every layout or usage pattern. Applicable requirements also vary by jurisdiction and system design. Installed airflow and actual drying performance still need attention.
Will mold-resistant paint solve ceiling mold?
It can help a suitable, dry surface resist growth, but it cannot correct persistent condensation or leaks. Address the moisture source and prepare the surface properly before repainting.
Should every musty bathroom be demolished?
No. Some problems are resolved through ventilation repairs, cleaning, or an accessible plumbing repair. Others require opening damaged assemblies. Investigation should determine the scope.
A Bathroom Should Dry Reliably After Use
A successful bathroom renovation needs more than attractive finishes. It needs dependable exhaust, continuous waterproofing, sound plumbing, and details that let surfaces dry.
If a new bathroom smells musty or develops recurring stains, investigate early. The most useful question is not which product will cover the damage. It is where the moisture comes from, why it remains, and what must change to keep the assembly dry.